Posts with tag: "Grand Canyon"


September 08, 2018

Tuweep is located in a remote corner of the North Rim of the Grand Canyon. It's hard to reach and requires a high clearance 4WD vehicle to make the three hour drive down a sixty mile long gravel road, the last couple of miles of which took me thirty minutes to cover. The National Park service estimates 25% of visitors get a flat tire on the way there or back which is pretty easy to believe, as there are some really rough stretches with sharp rocks to navigate around. Fortunately I made the trip without incident even though the jeep I rented was pretty beaten up. 


When you arrive at the overlook there are no lodges, restaurants, services or cell reception, just ten campsites. You are definitely off the grid. Due to its remote location far from the lights of a major city, this area was designated an International Dark Sky Park in 2014, and the view of the planets, stars and Milky Way is as good as you are likely to find just about anywhere in the United States. Even though it was Labor Day weekend I only saw about a dozen people during my visit, a refreshing change from the large crowds at the more accessible parts of the Grand Canyon. 


The views are pretty spectacular. Tuweep is one of the few places at the Grand Canyon where you have an unobstructed view of the Colorado River. From the rim, you can watch and hear the rafters running the rapids at Lava Falls, three thousand feet directly below you. Trying to take pictures here is nerve racking as you need to stand right on the edge of a cliff to get the best view. It's not a place to visit if you suffer from vertigo.


I was able to get within a couple of feet of the edge to photograph the two images seen here. The picture above is the view looking west toward sunset and the one below the view of sunrise. 


September 10, 2015

The Vermillion Cliffs National Monument straddles the Utah/Arizona border northeast of the Grand Canyon and contains the most bizarre and incredible landscape I've ever seen. Within the monument is an area called North Coyote Buttes, one of the most sought after locations for landscape photographers around the world to visit. If you have a bucket list of places to see, definitely put the Vermillion Cliffs on it. 

North Coyote Buttes covers a relatively large area, but the main attraction is a section called the Wave, a picture of which is shown above. Protected by the Bureau of Land Management, only twenty people per day are allowed to visit. A lottery system was put in place a number of years ago to manage the large number of people - mostly foreign tourists - interested in visiting. To give you an idea of the hikes' popularity, over seven hundred people applied the day I won a permit and this was during the summer when the temperatures typically exceed 100 degrees. Heavy rainstorms in the days prior to my trip had thankfully dropped the temperatures to well below normal, although the resulting flash floods made the primary access road impassable, resulting in a much longer drive to the trailhead.

To properly visit the area requires an eight mile trek through unmarked desert, a good bit of which involves climbing up and down slip rock, hiking through sand dunes and in our case, a short wade through a tight passageway. It's definitely a good workout. We hired a guide named Marjorie Casse through Dreamland Photo Tours, an outfit located in Kanab, Utah, to help us better explore the area. In retrospect it was a good decision given the risks of getting lost or injured in this remote area. The hike was my second time taking a trip with Dreamland and I can highly recommend their services if you will be traveling in Southern Utah/Northern Arizona, even if you are not interested in photography. You can reach them at http://www.dreamlandtours.net

Photographing the wave is, unlike most landscape photography, best done midday when the sun is directly overhead. Wide angles work best for capturing the entirety of it and telephotos can be used to highlight the amazing swirls and patterns in the Navajo sandstone rocks. Later this year I'll be posting many more pictures from this hike as well as from previous trips to nearby South Coyote Buttes and White Pocket, a couple of the other remarkable locations within the Vermillion Cliffs.

Stay tuned.

 
July 05, 2015

Upper Antelope Canyon

Southern Utah and Northern Arizona are home to dozens of slot canyons and none are more famous for photographers than Upper and Lower Antelope Canyons. Located on Navajo land just a few miles outside of Page, Arizona, tourists from around the world flock to these sites as they travel around the Southwest.

The two slot canyons are seperated by just a few miles. Upper Antelope, the more popular, is a relatively flat hike, then back out the same way. It gets very crowded in the summer. The canyon is up to 120 feet deep in places and is known for the beams of light than illuminate the inside of the canyon around midday. In addition to the regular tours, the Navajo operators run special tours for photographers where they ensure everyone is positioned in the right spots as the beams begin to appear. Squeezed tightly together are lines of people kneeling and others directly above them as the legs of their tripods intersect. The guides then throw shovels full of sand into the air to better highlight the beams and dozens of photographers start clicking away like mad. It's possibly the most stressful experience I've had photographing something yet I can't ever remember getting so many good images in so short a period of time 

The canyons are formed when flash floods hit and over many thousands of years the runoff carves the soft Navajo sandstone into amazing twisted passageways. During really heavy storms water will fill the entire canyon. Since seventeen tourists were killed in 1997, warning systems are now in place to allow evacuation when rainstorms threaten the area, and emergency ladders can be dropped down if necessary. 

Lower Antelope Canyon

Lower Antelope Canyon is more fun to visit and a little more challenging as it requires navigating by going up and down a series of ladders. As a result, the crowds here are a little lighter than at Upper Antelope. It's a very narrow one way hike and though it lacks the dramatic light beams of Upper Antelope it easily makes up for that with plenty of beautiful colorful formations to photograph. I timed my visits here for first thing in the morning and had the canyon all to myself for quite a while until the crowds started trickling in. My excellent guide directed me around the best areas while he played Native American songs on his homemade flute.  

Since the canyons are relatively dark, properly photographing them to capture all the details requires a tripod. But you can also get pretty good photos using a hand held approach or even with an iPhone (set it to chrome for the best results). The guides know the most photogenic locations within the canyons and will even adjust your camera settings and take pictures for you. So even if you are a terrible photographer you are bound to come away with some great images.

If you are planning a trip to the Grand Canyon, Zion or Bryce try to make time for a visit to one, or both of these incredible places. And for a similar experience without the crowds try nearby Rattlesnake, Owl or Mountain Sheep Canyons, or one of many other slot canyons in Southern Utah. You won't be disappointed.

Contact:  Upper Antelope: www.navajoantelopecanyon.com   Lower Antelope: www.lowerantelope.com

 
April 20, 2015

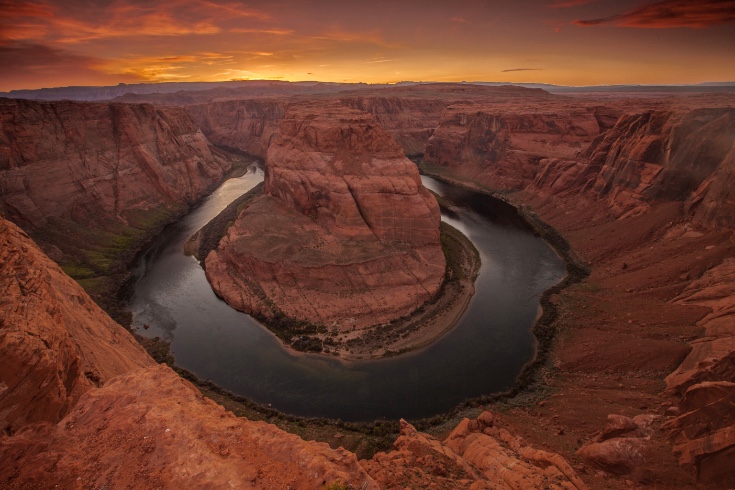
Just a few miles outside of Page, Arizona, the Colorado River takes a large curve before heading south and west toward the Grand Canyon proper.  A short hike from the parking lot on Hwy 89 takes you to the edge of a 1,000 foot cliff overlooking Horseshoe Bend, one of the most iconic views of the American Southwest.

Trying to take a good photograph of it is difficult. Hundreds of tourists walk away every day with images that look nothing like they remember the view to be. So let's look at what they are doing wrong.

The human eye has a remarkable ability to adjust to varying light conditions as our pupils expand and contract. At sunset, Horseshoe Bend is in dark shadow and the sky is very bright. When we look down our eyes quickly adjust and we can see lots of details in the rocks and water. Likewise, when we look up at the sky the same thing occurs and we can quickly pick up the details in the clouds.

A camera does not have this same ability to handle extremes in lighting, so one of two things happens when we try to take a typical shot of this scene - either the sky comes out looking good but the canyon is too dark, or the canyon is exposed properly and the nice details of the orange clouds get washed out. If you have ever taken a picture of someone standing indoors in front of a bright window the same thing happens, unless you use a flash.

There are a couple of ways to work around this issue.

Graduated Filters - For just a few dollars you can purchase a graduated filter which is a simple way to correct these types of extreme lighting issues.


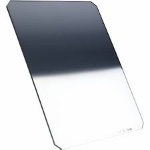
This filter has a clear portion and a darkened area and you simply position the dark area so it lines up with the horizon, darkening the bright sky and compressing the range of light to a level the camera can work with. The evening I shot this picture of Horseshoe Bend the lighting range was so extreme I had to stack two of these filters together to get the exposure just right. Graduated filters don't work in all circumstances since you have to have a straight horizon for them to produce the right effect. But they are great for things like sunset pictures when you are at the beach. 

Image Blending (HDR) - Most high end cameras have a bracketing function which allows a series of three photos to be taken in quick succession. There is a standard exposure, an overexposed one and an underexposed one. You can then use various software programs like Photomatix to blend the best attributes of the three images, resulting in a picture in which both the highlights and shadows look good. If you have an iPhone 6 you may have noticed a HDR setting on your camera app. It uses this exact process without the need for editing photos after the fact and it works pretty decently. HDR is a good alternative to graduated filters in situations where there is not a clear horizon line, for example, images of cityscapes or mountain ranges.

Next time you find yourself wanting to take a picture with an extreme range of light try one of these techniques, or just put away your camera and use your iPhone.